
Have you ever thought about contributing to WordPress or any other open-source project that’s on GitHub, but you’re overwhelmed and confused on where to begin?
That was me too until I started contributing to the WordPress Documentation and Marketing teams this year.
The Documentation team recently created a GitHub repository for documentation issues and the Marketing team was beginning to migrate all their tasks into GitHub.
So it became imperative that I familiarize myself with collaborating on GitHub. Here’s what I learned.
There are two ways you can start working on open source GitHub Projects.
- Work directy on GitHub and submit a pull request (PR).
- Fork the repositiory, work locally and submit a pull request (PR).
Method 1: Work directly on GitHub
This method is the easiest as GitHub takes care of forking, branching, and submitting the PR. I work directly on GitHub when I am tackling minor issues like a typo in the documentation.
What you’ll need to get started?
You’ll need to create a FREE account in GitHub, if you don’t have one, and/or sign in with your GitHub account, to start contributing.
The contribution process:
- Select the repository on GitHub where you want to contribute.
- Make a copy of the repository to your GitHub. This process is called Forking.
- Make the change to your copy.
- Submit that change to the maintainers of the main repository so they can review. This is called a Pull Request (also called PR).
- Once the PR is approved, your changes are merged into the main repository.
Step by step guide to working directly on GitHub:
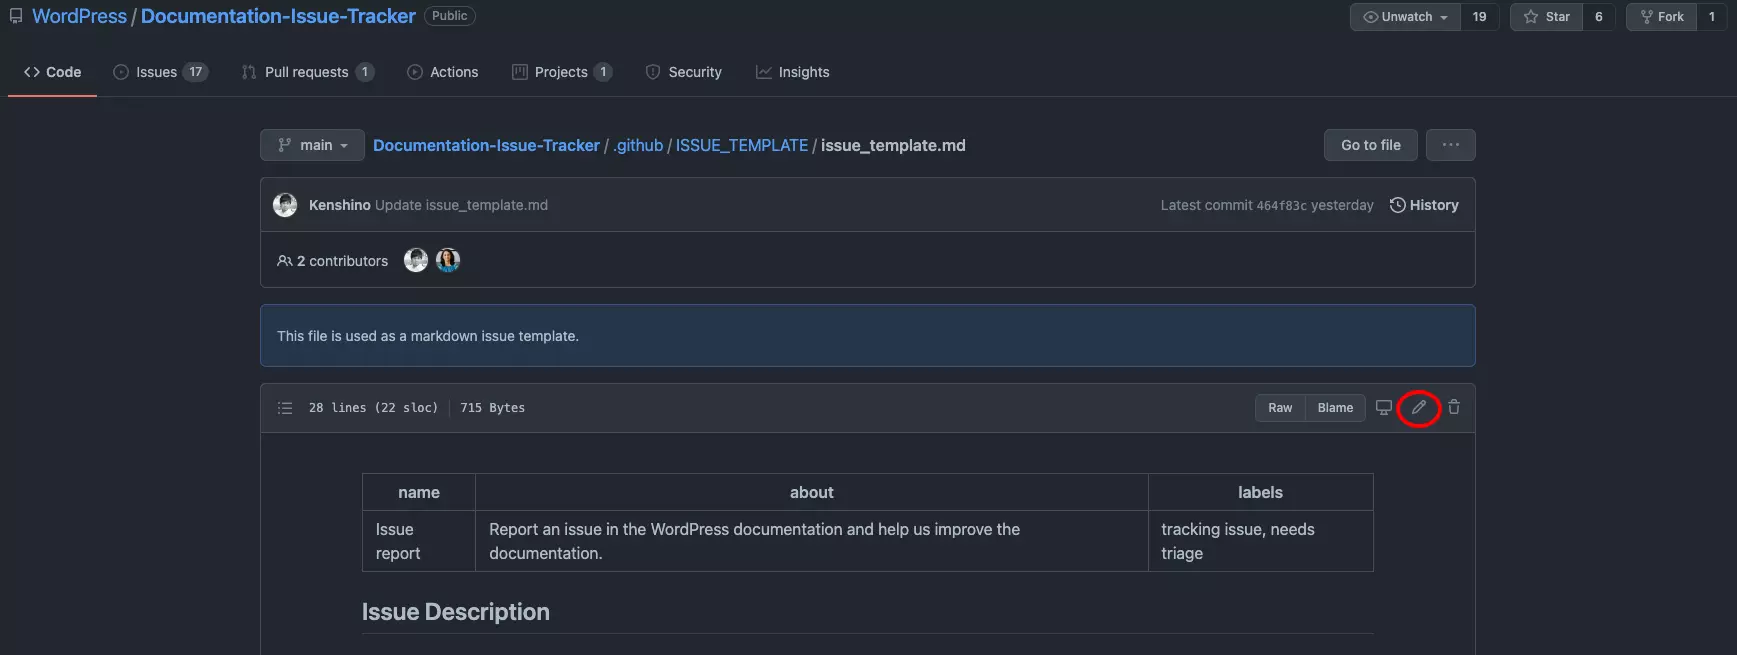
STEP 1: Log in to your GitHub account and find the repository you want to contribute to. In my case, it was the WordPress/Documentation-Issue-Tracker.
STEP 2: Navigate to the file that you want to edit. Click on the ‘Pencil’ icon to edit the file directly on GitHub.
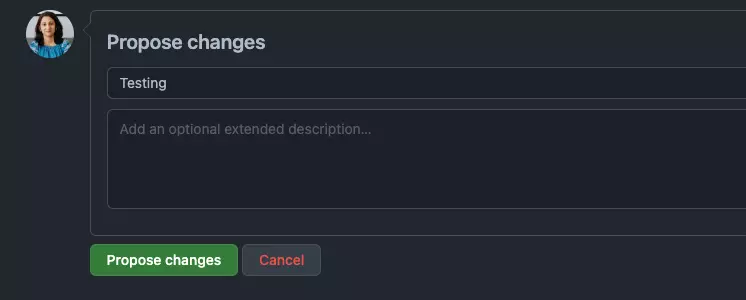
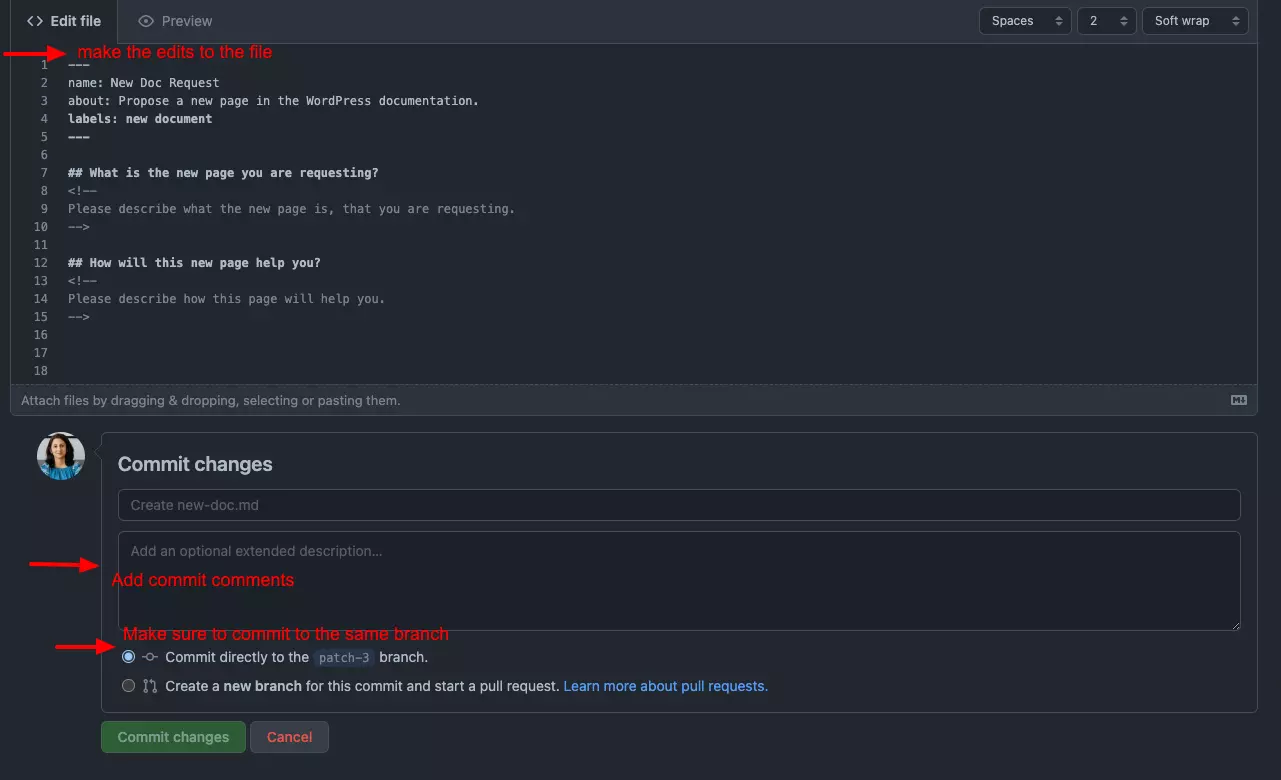
STEP 3: Once you make the edits, scroll down to the ‘Propose Changes’ section. Write a description related to the change you made. Click the green ‘Propose changes’ button. This will automatically create a fork of the repository in your GitHub account, create a new branch in your forked copy with your edited file.
STEP 4: You’ll be taken to a ‘Comparing changes’ screen. From here, you can compare the changes in the files between your copy and the one in the main branch.

STEP 5: Click the ‘Create pull request’ button to start a PR. In the PR form, provide the details of the changes you made. You can add as many details as you want including screenshots, how to test etc. This will help the reviewer and make it easier for them to approve.
STEP 6: Click the ‘Create pull request’ button and it will create your PR and submit it for review. You can find your PR on the pull requests tab.

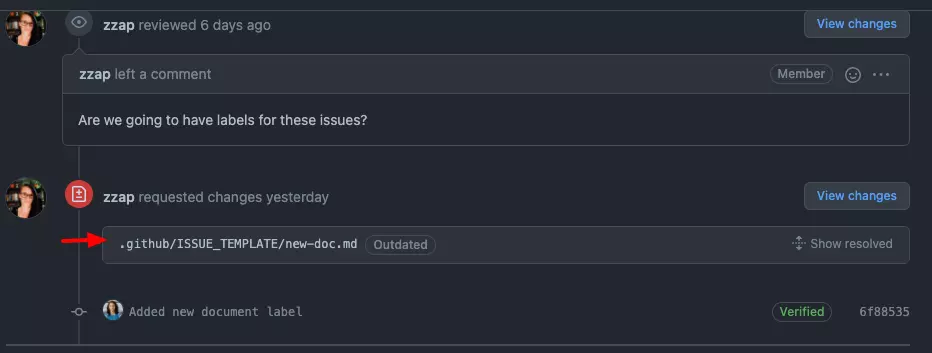
STEP 7: Check for any updates to your PR. Sometimes the reviewer might come back with a comment or request a change. If you need to make edits, click on the file and select the three dots menu on the right-most corner and click ‘Edit file’. This will keep your edits together in a single PR.

STEP 8: Once the PR is approved, it is merged into the main branch in the main repository.
Method 2: Work locally
This method is more advanced and is about managing the edits on your local computer. If I am doing extensive markdown or scripting, I tend to work locally so I can code in my preferred text editor.
What you’ll need to get started?
- You’ll need to create a FREE account in GitHub, if you dont have one and/or sign in with your GitHub account, to start contributing.
- A code editor. I use Visual Studio Code.
- Git installed on your local machine either using a package manager or from the git site.
- If you are not comfortable with the command-line, you need a GUI client installed.
The contribution process:

- Select the repository on GitHub where you want to contribute.
- Make a copy of the repository to your GitHub account. This process is called Forking.
- Pull down a copy of the files from the repository into your local computer. This process is called Cloning.
- Make a new branch.
- Make your changes on the branch in your local copy.
- Commit your changes and push the changes back to your repository on GitHub.
- From your forked repository in GitHub, submit your change to the maintainers of the main repository for review. This is called a Pull Request (also called PR).
- Once the PR is approved, the edits from your GitHub repository are merged into the main repository.
Step by step guide to working locally:
STEP 1: Log in to your GitHub account and find the repository you want to contribute to. In my case, it was the WordPress/Documentation-Issue-Tracker.
STEP 2: Click ‘Fork’ in the right-hand corner.

This creates a copy of the repo to your GitHub account; for my GitHub account femkreations, the copy is created at: https://github.com/femkreations/Documentation-issue-Tracker.
STEP 3: Open a terminal and run the git command below: This clones your forked repository, creates a directory called Documentation-Issue-Tracker on your computer, and copies all the files from your GitHub repo in there. Depending on the size of the repo, this might take a while.
git clone https://github.com/femkreations/Documentation-Issue-TrackerSTEP 4: Create a new branch eg: add-markdown.
git checkout -b add-markdownThis creates a branch called ‘add-markdown’ and switches to the new branch.
STEP 4: Navigate to the file you want to edit, and make your changes using your preferred code editor.
STEP 4: When you are done with the edits, commit your changes to your local copy of the repository on your machine. Make sure you add a useful commit message.
git commit -m "Your Commit Message"/path-to-fileSTEP 5: Push your edits to your copy of the GitHub repository.
git push -u origin mainWhen you go into your repository on GitHub, you will notice a banner at the top detecting the change.

STEP 6: Click on the ‘Contribute’ drop down and click the ‘Open Pull Request’ button. This creates the request on the main repository to integrate the change from your repository.

STEP 7: You’ll be taken to a ‘Comparing changes’ screen. From here, you can compare the changes in the files between your copy and the one in the main branch.

STEP 8: Click the ‘Create pull request’ button to start a PR. In the PR form, provide the details of the changes you made. You can add as many details as you want including screenshots, how to test etc. This will help the reviewer and make it easier for them to approve.
STEP 9: Click the ‘Create pull request’ button and it will create your PR and submit it for review. You can find your PR on the pull requests tab.
STEP 10: Check for any updates to your PR. Sometimes the reviewer might come back with a comment or request a change. If you need to make edits, click on the file and select the three dots menu on the right-most corner and click ‘Edit file’. This will keep your edits together in a single PR.
You should not make a new PR when you make further edits. To make additional changes on the same PR, make your change locally on the same branch. Commit your change and push it up. It will update the existing PR.
STEP 11: Once the PR is approved, it is merged into the main branch in the main repository.
I hope this article helps you get started with contributing to WordPress or any other open-source projects on GitHub.